Do you have an acoustic guitar, ukulele, or cavaquinho and would like to connect it to an amplifier?
A simple and very interesting solution is to build your own piezoelectric pickup, also known as a crystal pickup.
That is exactly what I did with one of my ukuleles. The instrument had no pickup system, so I installed a piezoelectric crystal in its body and a 1/4-inch output jack so I could connect it directly to an amplifier.
The project is quite simple and, besides transforming the instrument, it is a great experiment for understanding how a piezoelectric crystal can convert mechanical vibration into an electrical signal.
What Is a Piezoelectric Pickup?
The main component of this project is the piezoelectric element.
You have probably come across this component inside:
buzzers;
doorbells;
toys;
alarms;
small sound-producing devices.
But there is an interesting characteristic: the piezoelectric effect can work in both directions.
We can apply electricity to produce vibration, but we can also mechanically deform the material and obtain an electrical potential difference.
It is precisely this second property that we use in the pickup.
Vibration Becomes Electricity
When we play a string on the instrument, we produce vibration.
This vibration is transmitted to the:
bridge;
soundboard;
body of the instrument.
If we place the piezoelectric element in a suitable location, this vibration causes small deformations in the piezoelectric material.
As a result, a small electrical voltage appears across its terminals.
We can represent the process as follows:
String vibrates
↓
Instrument vibrates
↓
Piezo undergoes deformation
↓
An electrical signal is generated
↓
Signal travels through the cable
↓
Amplifier
↓
Speaker
In my project, the signal produced by the piezo is sent to the amplifier, allowing us to hear the amplified sound of the ukulele.
Why Is It Called a “Crystal” Pickup?
In the original article, I used the expression crystal pickup, explaining that the name is related to the piezoelectric structure of the component. When the material undergoes deformation, it generates an electrical potential difference across its terminals.
It is this small potential difference that carries the information corresponding to the instrument’s vibrations.
We do not need to install a battery in the piezo for it to produce this signal.
An Extremely Simple Passive Pickup
This is one of the great advantages of this experiment.
The basic pickup does not require a:
battery;
power supply;
integrated circuit;
transistor.
In its simplest form, we basically have:
piezo + shielded cable + 1/4-inch jack.
It is difficult to imagine a much simpler pickup system.
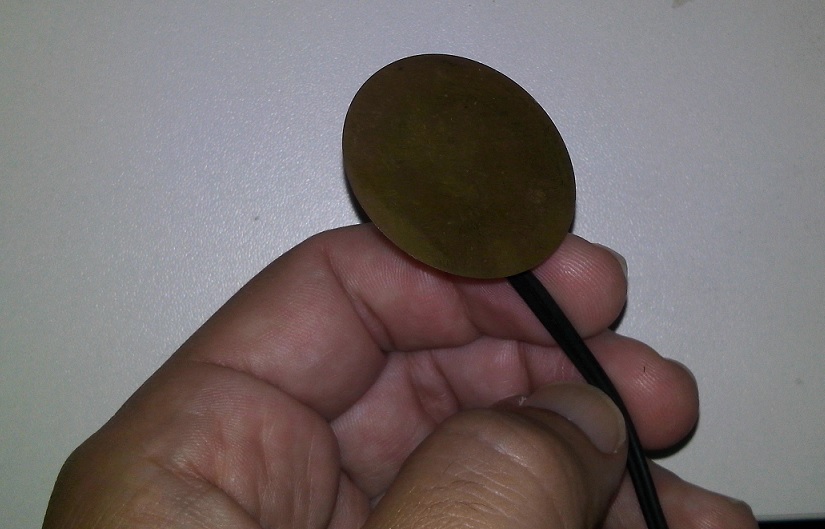
The Piezoelectric Crystal
The component I used can be found in electronics stores.
It normally looks like a small metal disc, with a region of piezoelectric material on one side.
Different sizes are available.
For an initial experiment, we can work with a common piezoelectric disc and observe how it responds to vibrations.
Try an Experiment Before Installing It in the Instrument
Before considering drilling a hole in an acoustic guitar or ukulele, it is worth performing a simple test.
Temporarily connect the piezo to a suitable cable and send the signal to a compatible audio input.
Then lightly tap the disc or place it against a vibrating surface.
You will immediately notice that it can detect:
touches;
taps;
vibrations.
This experiment helps you understand the principle before permanently installing the pickup.

The Pickup Circuit
On the original page, I also show the circuit used to connect the piezoelectric crystal to the instrument’s output.
The principle is simple: we need to connect the two terminals of the piezo to the output jack.
But there is one very important detail:
the wire must be shielded.
Why Use Shielded Wire?
In my project, I explicitly recommended using shielded wire to prevent electrical mains hum.
This is because we are working with a relatively small audio signal.
An ordinary wire can act like an antenna and pick up interference from the surrounding environment.
The result may come through the amplifier as that familiar:
“hummmmmm…”
That is why shielded cable is a much better choice.
How Does Shielded Cable Work?
In simple terms, it has:
central conductor → signal
and
outer shield → reference/shielding.
The shield surrounds the signal conductor and helps protect it against electromagnetic interference.
This principle is used in practically all audio equipment.
That is precisely why guitar cables are not simply two ordinary wires running side by side.
The 1/4-Inch Jack
To connect the ukulele to an amplifier, I installed a female 1/4-inch (P10) jack on the side of the instrument.
This made the external connection extremely simple:
instrument → 1/4-inch cable → amplifier.
The instrument can now be connected in the same way as many other amplified instruments.
Where Did I Install the Jack on the Ukulele?
This is an interesting detail of my build.
The ukulele has a very small soundhole.
This makes it difficult to reach inside the instrument to work on the installation.
For this reason, I drilled the hole and installed the jack in a side area where I could access the interior more easily.
In other words, the position was not chosen solely for aesthetic reasons.
It was also chosen with the following in mind:
installation.
Before Drilling Your Instrument
Here is an important recommendation.
Drilling a hole in the instrument is a permanent modification.
Before picking up the drill, check:
where the jack will be positioned;
whether there is enough space inside;
whether you will be able to tighten the nut;
whether there are any structural reinforcements in that area;
whether the jack is long enough.
For a valuable or historically significant instrument, I would not make a permanent modification without first considering a reversible solution or consulting a luthier.
Test the Piezo Position Before Gluing It
The location where the piezo is installed has a considerable influence on the result.
This is because different areas of the instrument do not vibrate in exactly the same way.
Therefore, an interesting strategy is to temporarily test different positions before permanently attaching it.
Play the instrument.
Listen.
Move the piezo to another position.
Play again.
This allows us to look for an area that provides a more interesting response.
It Is Not Just a Matter of “Sound” or “No Sound”
The position can affect characteristics such as:
volume;
bass;
treble;
attack;
mechanical noise.
The piezo detects structural vibrations.
Therefore, it can also pick up things that we normally do not perceive as strongly acoustically.
It Can Pick Up Taps on the Body
This can also be an advantage.
If you use percussive techniques on an acoustic guitar or ukulele, the piezo can pick up taps made directly on the body.
Depending on your playing style, this opens up interesting possibilities.
The instrument no longer provides only the sound produced by its strings.
But There Is a Problem: Feedback
A pickup system installed in an acoustic instrument can produce feedback, especially when amplification is used at high volumes.
In my ukulele, I adopted a very simple solution:
I placed thick foam inside the body of the instrument.
Based on the experience I described in the original post, the solution worked very well.
I had no feedback problems, even when using the ukulele in the studio.
What Happens During Feedback?
Acoustic feedback can occur:
Instrument produces sound
↓
Pickup sends the signal to the amplifier
↓
Speaker reproduces the sound
↓
Sound from the speaker makes the instrument vibrate
↓
Pickup detects the vibration again
↓
Amplifier amplifies the signal again
The cycle can continue and rapidly increase in intensity.
This is the familiar phenomenon known as feedback.
The Foam Helps Control Resonances
In my build, the thick foam placed inside the ukulele helped control this behavior.
However, there is an obvious consequence: placing material inside the soundbox can also change how the instrument resonates acoustically.
Therefore, this solution needs to be evaluated according to the intended purpose.
In my case, it worked very well for the way I intended to use the instrument.
Piezoelectric and Magnetic Pickups Are Different
A conventional magnetic guitar pickup works primarily through the interaction between:
metal strings + magnetic field.
A piezo works differently:
mechanical vibration → material deformation → electrical signal.
This makes it possible to use a piezo in instruments where a conventional magnetic pickup would not be a natural solution.
That Is Why It Works So Well as an Experiment for a Ukulele
The strings on many ukuleles are not ferromagnetic.
Therefore, a conventional magnetic pickup does not work in the same way it would on a guitar with suitable strings.
The piezo does not depend on this principle.
What matters to it is:
vibration.
That is why it is such an interesting solution for:
ukulele;
acoustic guitar;
cavaquinho
and many other acoustic instruments.
There Is an Important Electrical Characteristic of the Piezo
A piezo has relatively high impedance.
This means that the input to which it is connected can significantly influence its sound response.
In a simple experiment, we can connect it directly to a suitable amplifier input, as I did in this project.
However, if we want to develop the system further, there is a very interesting improvement:
adding a preamplifier with high input impedance.
What Would a Preamplifier Be Used For?
It could act as an interface between:
piezo
and
audio equipment.
In addition to providing better impedance matching, an active circuit could offer:
gain;
volume control;
equalization;
signal buffering.
At that point, our extremely simple pickup begins to evolve into a more complete electronic pickup system.
It Is Possible to Make a Version with Volume Control
After building the pickup, we can consider adding a potentiometer.
This would allow the instrument to have local control over the signal level sent to the amplifier.
Taking the project a step further, we could also add tone controls.
We then have an interesting progression:
simple piezo
↓
piezo + volume
↓
piezo + preamplifier
↓
piezo + preamp + equalization.
But Start with the Simplest Version
One of the things I like about this project is that we do not need to start with all these electronics.
First, we build:
piezo → cable → 1/4-inch jack → amplifier.
We hear it working.
We understand the principle.
Then we can add complexity.
This is a very interesting way to learn electronics.
Be Careful When Soldering the Piezo
The piezoelectric disc is relatively delicate.
It is not a good idea to keep the soldering iron heating its terminals for too long.
Prepare everything beforehand:
wire;
soldering iron;
solder.
Make a quick, clean solder joint.
Avoid repeatedly heating the same area.
Also Provide Strain Relief for the Wire
Another important precaution is to prevent the cable from pulling directly on the piezo’s solder joint.
The instrument will be:
moved;
transported;
connected;
disconnected.
If all the mechanical stress reaches the solder joint, the connection may break.
Secure the cable properly so that the solder joint does not act as a mechanical support.
Insulate the Connections
After soldering, protect any exposed conductive areas when necessary.
We can use suitable materials, such as heat-shrink tubing where appropriate.
The idea is to prevent:
short circuits;
accidental contact;
loose wires.
Even a simple build deserves a good finish.
Test Everything Before Closing It Up
Do not complete the installation only to discover afterward that something is wrong.
While the system is still accessible:
connect the cable;
connect it to the amplifier at low volume;
play the instrument;
carefully move the wiring;
check for hum;
check the jack.
Only then should you finish the installation.
If There Is Too Much Hum
Start by checking the:
shielded cable;
shield continuity;
solder joints;
1/4-inch jack;
external cables being used.
In the original project, I specifically recommended shielded wire to prevent interference from electrical mains hum.
If the Sound Is Too Quiet
First, confirm that the piezo is actually producing a signal.
Then check the:
solder joints;
pickup position;
cable;
amplifier input.
It is also important to remember the impedance issue.
Depending on the input being used, a suitable preamplifier or buffer can significantly improve signal transfer.
If There Is Too Much Feedback
In my case, the solution was thick foam inside the ukulele, which produced excellent results even when I used the instrument in the studio.
However, it is also worth checking the:
position relative to the speaker;
volume level;
gain;
equalization;
pickup position.
Acoustic feedback results from the entire system, not just the piezoelectric component.
The Best Part of This Project Is Seeing Electronics in Action
When we study the piezoelectric effect only in theory, we can memorize:
“Mechanical deformation produces an electrical potential difference.”
That’s fine.
But here, we do something much more interesting.
We take a small crystal.
Place it in an instrument.
Play a string.
And hear that vibration coming through an amplifier.
Theory immediately becomes a real experiment.
From the Crystal to the Speaker
We can follow the entire signal chain:
finger moves the string
↓
string vibrates
↓
instrument body vibrates
↓
piezo is deformed
↓
an electrical voltage is generated
↓
shielded cable carries the signal
↓
amplifier increases the signal
↓
speaker moves the air
↓
we hear the amplified instrument.
This small project connects:
mechanics;
electricity;
electronics;
acoustics;
music.
My Ukulele Working with the Homemade Pickup
On the original page, I show the ukulele with the crystal pickup installed, the piezoelectric crystal, the circuit used, the position of the foam placed inside the instrument, and a video demonstrating the result.
In the video, I am playing the ukulele through a guitar amplifier.
The instrument originally had no pickup system of any kind.
With an extremely simple electronic component, shielded wire, and a 1/4-inch output jack, it became possible to amplify it.
An Excellent First Project in Applied Audio Electronics
This is exactly the kind of project I find very interesting for beginners.
It is not a circuit built merely to observe a reading on a multimeter.
In the end, we have something we can actually use:
an amplified acoustic instrument.
And during the process, we learn about:
piezoelectricity;
audio signals;
shielded cables;
interference;
1/4-inch jacks;
feedback;
amplification.
All from a small piezoelectric disc.
The video is in Portuguese. Use YouTube’s translation feature.
Want to Learn Applied Audio Electronics?
This project is directly related to applied audio electronics: we start with an extremely small mechanical vibration, convert it into an electrical signal, and then need to transmit and amplify that signal properly.
It is precisely this kind of practical application that helps us understand why concepts such as pickups, impedance, shielding, preamplification, and amplification are important.
In my Applied Audio Electronics Course, the goal is to study electronics by applying these concepts to real-world situations—from basic components to pickup and amplification circuits.
The piezoelectric pickup is a great example of this approach:
a simple component, a simple circuit, and an experiment in which we can literally hear electronics in action.
To explore more free content about pickups, transducers, amplification, pedals, and audio circuits, also visit the Applied Audio Electronics section.